
Table of Contents
ToggleA green bathroom vanity isn’t just a nod to trend cycles, it’s a deliberate choice that brings natural warmth, depth, and personality to a space often dominated by white fixtures and neutral tile. In 2026, green has moved beyond accent walls and into furniture-grade cabinetry, with homeowners choosing everything from soft sage to deep emerald to anchor their bathroom design. Whether updating a powder room or tackling a full bath remodel, a green vanity bathroom setup offers flexibility in style, pairs well with both warm and cool tones, and works across traditional, modern, and transitional interiors. This guide walks through shade selection, material considerations, installation basics, and design pairings to help anyone confidently integrate a green bathroom vanity into their next project.
Key Takeaways
- A green bathroom vanity brings natural warmth and durability to your bathroom while hiding wear better than light finishes, making it ideal for high-traffic family spaces.
- Choose your green shade strategically: soft sage and mint work for smaller bathrooms, olive and moss complement vintage styles, while deep hunter and emerald tones create drama in well-lit spaces.
- Pair your green vanity with the right materials—solid wood, cabinet-grade plywood, or moisture-resistant MDF—and finish with quality paint or stain to ensure longevity in humid bathroom environments.
- Proper installation requires measuring twice, checking plumbing alignment, securing floating vanities to wall studs with a ledger board, and ensuring floor levelness before final mounting.
- Complement your green bathroom vanity with strategic hardware choices (brass for warmth, matte black for contrast), neutral wall colors, and consistent lighting to create a cohesive, balanced design.
Why Choose a Green Bathroom Vanity?
Green introduces a grounded, organic element that balances the hard, reflective surfaces typical in bathrooms, tile, glass, chrome, porcelain. Unlike grays or beiges that can feel flat under fluorescent or LED lighting, green reads consistently across different color temperatures and times of day.
From a practical standpoint, green hides wear better than white or light wood tones. Scuffs, water spots, and minor dings blend into most green finishes, especially matte or satin sheens. This makes it a solid choice for high-traffic family baths or guest bathrooms that see inconsistent cleaning schedules.
Green also supports a range of design directions. A light green bathroom vanity fits farmhouse, coastal, and Scandinavian aesthetics. Mid-tone greens like olive or moss anchor vintage, rustic, or maximalist spaces. An emerald green bathroom vanity leans formal and works well in art deco, modern glam, or moody, jewel-toned interiors.
Beyond aesthetics, many homeowners associate green with sustainability. While paint color alone doesn’t make a vanity eco-friendly, it often prompts buyers to seek out formaldehyde-free MDF, FSC-certified plywood, or reclaimed wood options, materials that align with low-VOC finishes and water-based topcoats.
Popular Shades of Green for Bathroom Vanities
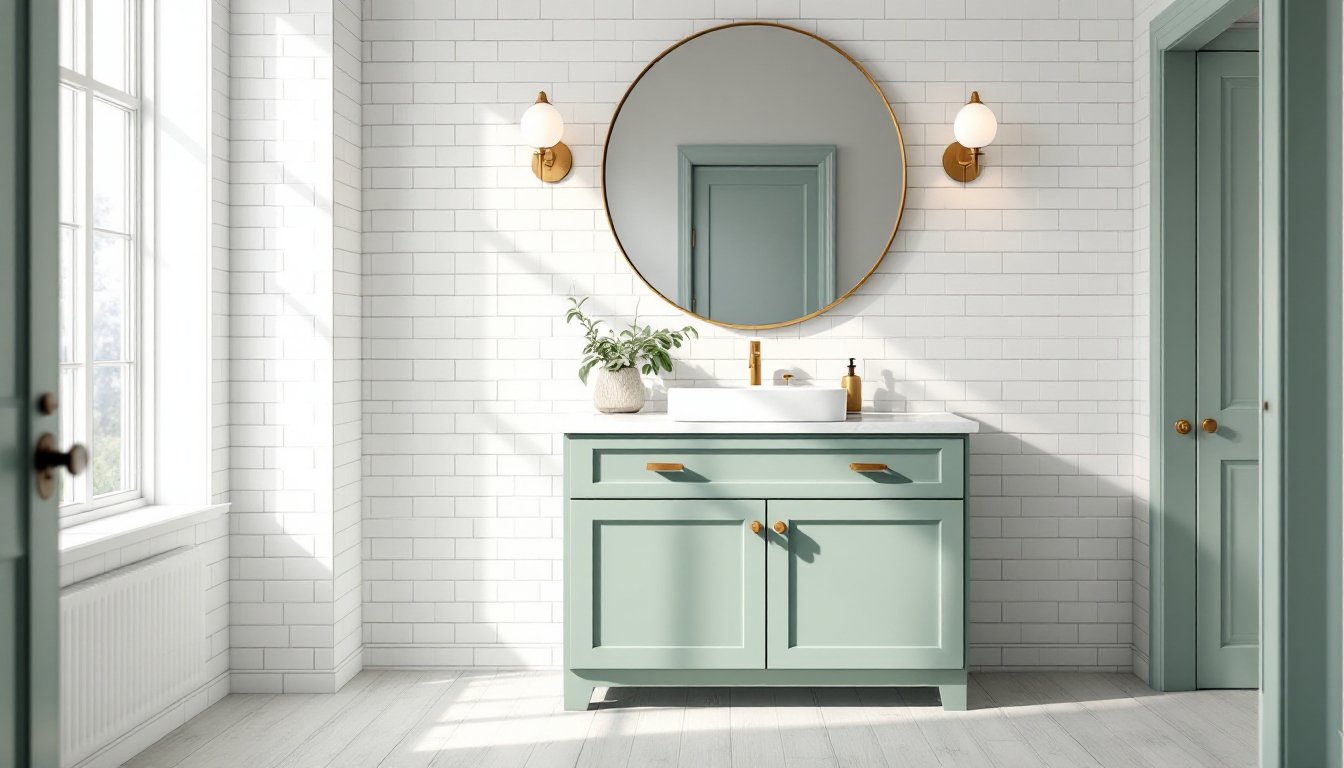
Sage and Mint (Soft, Cool Greens)
These lighter tones read almost neutral and pair easily with white subway tile, brass hardware, and natural wood accents. Sage works particularly well in smaller bathrooms where darker colors might make the space feel closed in. It’s forgiving under various lighting and complements both warm and cool undertones in countertops and flooring.
Olive and Moss (Earthy, Mid-Tone Greens)
Olive brings warmth and pairs naturally with terracotta, beige, and cream. It’s a strong match for vintage-style bathrooms with patterned tile or wood wainscoting. Moss leans slightly cooler and works with concrete-look tile, black fixtures, and industrial elements. Both shades offer good contrast against white or light stone countertops without overwhelming the space.
Hunter and Forest (Deep, Saturated Greens)
Deep greens create drama and work best in bathrooms with adequate natural light or well-planned task lighting. They pair well with marble, quartz with heavy veining, and polished nickel or matte black hardware. These shades suit traditional, transitional, and modern interiors but require careful balance, too much dark cabinetry in a small, poorly lit bathroom can feel heavy.
Emerald and Teal (Jewel Tones)
An emerald green bathroom vanity makes a statement and works especially well when the rest of the bathroom palette stays neutral. Teal sits between green and blue, offering flexibility in coordinating with both warm golds and cool silvers. These shades shine in powder rooms or primary baths where the vanity serves as a focal point.
When selecting a shade, test samples in the actual bathroom. Paint a foam board or piece of MDF and prop it against the wall at different times of day. Bathroom lighting, often a mix of overhead cans, sconces, and natural light, can shift how green reads, especially if there’s a yellow or blue cast from the bulbs.
Choosing the Right Green Vanity for Your Bathroom Style
Modern and Contemporary
Clean lines, flat-panel doors (slab or shaker with minimal detailing), and integrated handles or push-to-open mechanisms work best. Pair a matte or satin green finish with a green bathroom vanity with sink that features an undermount basin and a quartz or solid-surface countertop. Floating vanities in mid-tone or deep greens create visual space and suit tight bathrooms where floor area is limited.
Traditional and Transitional
Raised-panel doors, decorative molding, and furniture-style legs give a green vanity bathroom a more classic look. Soft greens like sage or mint suit this style, especially when paired with marble or granite countertops and polished brass or chrome hardware. Many manufacturers offer semi-custom vanities that allow for adjustments in depth, height, and drawer configuration, useful when retrofitting an older bathroom with non-standard plumbing rough-ins.
Farmhouse and Rustic
Reclaimed wood vanities painted or stained green bring texture and character. Look for distressed finishes, open shelving, or glass-front cabinets. A vessel sink or apron-front basin complements this style. Be mindful of moisture exposure, reclaimed wood should be properly sealed with a water-resistant topcoat, especially near sinks and in humid climates.
Industrial and Minimalist
Deep greens like hunter or charcoal-green pair well with concrete countertops, matte black fixtures, and metal accents. Keep hardware minimal, bar pulls in black or raw steel. Open shelving with metal brackets or pipe fittings reinforces the industrial look. If building a custom vanity, consider using 3/4-inch plywood with a green lacquer finish for durability and a smooth, modern surface.
For those browsing design inspiration galleries, filter by bathroom size and style to see how different green vanity bathroom ideas photograph in real spaces. Pay attention to lighting, countertop pairings, and hardware finishes that recur in saved images, that consistency often signals what works well together.
Materials and Finishes That Work Best
Cabinet Box Construction
Solid wood (maple, oak, poplar) offers durability and can be refinished if the color no longer suits the space. It’s heavier and more expensive but holds up well in humid environments when properly sealed. Plywood is a strong alternative, lighter than solid wood, more stable, and less prone to warping. Look for 3/4-inch cabinet-grade plywood for vanity boxes.
MDF (Medium-Density Fiberboard) is common in painted vanities. It takes paint well and provides a smooth surface, but it’s vulnerable to moisture if the finish is compromised. If choosing MDF, confirm it’s moisture-resistant (often labeled MR-MDF) and that edges are sealed before painting. Avoid particleboard in bathrooms, it swells and degrades quickly when exposed to water.
Paint vs. Stain
Paint offers the widest range of green shades and a uniform finish. Use a high-quality primer (oil-based or shellac-based for best adhesion) and a durable topcoat, satin or semi-gloss sheens are easier to wipe down than flat finishes. For a factory-like finish, consider a sprayed lacquer or conversion varnish, which provides a harder, more chemical-resistant surface than brushed latex.
Stain works on wood species with visible grain (oak, ash, walnut). Green stains are less common but available through specialty suppliers. Alternatively, apply a green dye followed by a clear topcoat for a translucent, layered effect. Test on scrap wood first, grain pattern and wood species dramatically affect final color.
Countertop Pairings
White or light-colored quartz and marble provide high contrast and brighten the space. Veined patterns add visual interest without competing with the green base. Butcher block or solid wood countertops bring warmth but require regular sealing with food-safe mineral oil or a waterproof finish like Waterlox. Concrete countertops suit industrial or modern styles and can be tinted or left natural gray.
For those exploring material combinations, note which countertop edges (square, beveled, waterfall) appear most often with painted vanities. Edge profiles affect both cost and style, waterfall edges add $200–$500 but create a seamless, contemporary look.
Installation Tips for Your Green Vanity
Measure Twice, Order Once
Bathroom vanities are sold in standard widths: 24″, 30″, 36″, 48″, 60″, and 72″. Measure wall-to-wall, accounting for baseboards, door swings, and toilet clearance. The International Residential Code (IRC) requires at least 15 inches from the vanity centerline to any side wall or obstruction, and 30 inches of clear floor space in front. If the vanity includes a countertop overhang, factor that into your measurements.
Check Plumbing Rough-In
Most vanities are drilled for center or offset drain and supply line placement. Measure from the wall to the center of the drain pipe and compare to the vanity’s specifications. If they don’t align, you may need to move the drain (requires cutting into the wall and possibly rerouting the P-trap) or choose a vanity with adjustable plumbing.
Wall Anchoring (Especially for Floating Vanities)
Floating vanities require solid backing. Locate studs with a stud finder and mark centerlines. If studs don’t align with the vanity’s mounting brackets, install a horizontal 2×6 or 2×8 ledger board between studs, screwed into each stud with 3-inch construction screws. The ledger distributes weight and allows you to mount the vanity securely.
For floor-mounted vanities, confirm the floor is level. If it’s off by more than 1/4 inch over the vanity’s width, shim the base before securing it to the wall. Use plastic shims (won’t compress or rot) and trim flush after installation.
Countertop and Sink Installation
If the countertop and sink are separate, dry-fit everything before applying adhesive or silicone. For undermount sinks, follow the manufacturer’s clamping and curing instructions, most require 24 hours before connecting plumbing. Drop-in and vessel sinks are more forgiving and can often be installed the same day.
Apply a bead of silicone caulk (mold-resistant, color-matched or clear) along the backsplash and side edges where the countertop meets the wall. Smooth with a wet finger or caulk tool before it skins over.
Safety and Permits
If replacing a vanity without moving plumbing or electrical, most jurisdictions don’t require a permit. If relocating fixtures, running new water lines, or installing new lighting, check local building codes. Incorrect drain slopes (should be 1/4 inch per foot minimum) or improper venting can cause slow drains or sewer gas infiltration.
Wear safety glasses when cutting, drilling, or working overhead. Use a respirator (N95 or better) if sanding MDF or working with solvent-based adhesives in an enclosed space.
Complementary Colors and Design Elements
Hardware Finishes
Brass and gold tones (brushed, satin, or aged) warm up green and suit traditional or transitional styles. Polished nickel and chrome offer a cooler, more formal look. Matte black provides high contrast and works across modern, industrial, and farmhouse aesthetics. Oil-rubbed bronze pairs well with deeper greens like hunter or forest.
Wall Colors and Tile
White or off-white walls (warm whites like alabaster or ivory, cool whites like pure white or chantilly lace) let the green vanity stand out. Soft grays, taupes, or blush tones create a layered, sophisticated palette. For a bolder approach, consider a darker wall color (charcoal, navy, terracotta) with white or light-colored tile to balance the heaviness.
Subway tile remains a versatile backsplash option, 3×6 white in a running bond or herringbone pattern. Patterned cement tile or zellige adds texture and complements both light and deep greens. Larger-format tiles (12×24 or larger) suit modern spaces and reduce grout lines, which simplifies cleaning.
Flooring
Light wood or wood-look tile (luxury vinyl plank, porcelain) provides warmth and contrast. Black-and-white checkerboard or patterned encaustic tile works in vintage or eclectic bathrooms. Light gray or beige tile is neutral and won’t compete with the vanity. Avoid overly busy patterns if the vanity or wall already has strong visual interest.
Lighting and Fixtures
Sconces flanking the mirror provide even, shadow-free task lighting, mount them at 60–66 inches from the floor to the center of the fixture, depending on ceiling height and user height. Choose fixtures with opal glass or fabric shades to diffuse light. Matte black, brass, or glass-and-metal combinations suit most green vanities.
Faucets should match or complement the hardware finish. Single-hole and widespread faucets are most common: confirm the countertop or sink is drilled accordingly. For those reviewing fixture options, pay attention to spout height and reach, tall vessel sinks require high-arc faucets, while undermount sinks work with standard or low-profile spouts.
Mirrors and Accessories
Framed mirrors in wood, metal, or painted finishes tie the vanity into the room. Round or arched mirrors soften angular tile and cabinetry. Medicine cabinets with mirrored fronts add storage without sacrificing wall space.
Keep accessories minimal, soap dispensers, toothbrush holders, and trays in matching metals or natural materials (wood, stone, ceramic). Greenery, whether real or faux, reinforces the organic feel of a green vanity without overcrowding the counter.
Conclusion
A green bathroom vanity offers durability, design flexibility, and a natural counterbalance to the clinical feel that can creep into all-white bathrooms. Whether opting for a soft sage, a bold emerald, or a grounded olive, the key is aligning shade, material, and finish with the bathroom’s size, lighting, and overall style. Proper installation, anchoring to studs, leveling carefully, and sealing all moisture-prone edges, ensures the vanity performs as well as it looks. With thoughtful pairings in hardware, countertops, and wall treatments, a green vanity becomes the anchor that pulls a bathroom together without overwhelming it.