

Table of Contents
ToggleThe fireplace wall is the natural focal point of any living room, family room, or den. Whether you’re working with a traditional wood-burning hearth, a gas insert, or an electric unit, the wall surrounding it sets the tone for the entire space. In 2026, homeowners are moving beyond builder-grade mantels and predictable brick to create statement walls that blend function, style, and personality. This guide walks through seven distinct approaches, from rugged stone and reclaimed wood to sleek tile and bold paint, offering practical installation insights, material specs, and honest guidance on what’s a weekend DIY project and what requires a pro.
Key Takeaways
- Fireplace wall ideas range from budget-friendly paint and shiplap to high-end materials like marble and stone veneer, each with distinct installation complexity and skill requirements.
- Thin stone and brick veneer create dramatic texture without structural load; DIY installation requires cement board, mortar tools, and a wet saw, while safety protocols around heat clearances are critical.
- Shiplap and reclaimed wood bring farmhouse charm but must maintain IRC code clearance of 6″ from the firebox opening—transition to non-combustible materials like tile or stone in the immediate heat zone.
- Tile and marble surrounds offer limitless design options and are highly durable; marble slab installations require professional handling due to weight and precision, while tile patterns like herringbone demand a wet saw and careful layout planning.
- Built-in shelving and media integration transform a fireplace wall into functional display and storage; proper stud location, cable management, and level craftsmanship are essential for a polished result.
- Minimalist contemporary designs using linear fireplaces, concrete finishes, and metal cladding require licensed professionals for gas line, electrical, and structural work, plus proper permitting.
Modern Stone and Brick Fireplace Walls
Natural stone and thin brick veneer deliver texture and mass without the structural load of full masonry. For a floor-to-ceiling statement wall, thin veneer stone (typically ¾” to 1½” thick) installs over cement board using Type S mortar. Ledgestone, stacked slate, and river rock are popular profiles: each comes in corner pieces and flats to simplify fitting.
Installation basics: Fasten ½” cement board to studs with 1¼” screws every 8″ on-center. Apply a scratch coat of mortar, let it cure 24 hours, then butter and press each stone into place, working bottom to top. Maintain ½” joints for a dry-stack look or wider for traditional pointing. Most DIYers can handle a 10′ × 8′ accent wall over a long weekend, but you’ll need a wet tile saw with a diamond blade for cuts and a mixing paddle for mortar consistency.
Thin brick veneer (about ½” thick) offers the warmth of reclaimed brick without the weight. Brands like Boral and General Shale provide modular systems with corner returns. Expect coverage of roughly 7 square feet per box. Mortar joints are struck with a pointing tool after initial set, around 30 minutes in moderate temps. Always wear safety glasses and a dust mask when cutting masonry: silica dust is a serious respiratory hazard.
Note: Fireplace surrounds must meet IRC clearances, typically 6″ from the firebox opening to combustibles. Stone and brick themselves are non-combustible, but the framing behind them is not. Consult local code if your install wraps the firebox closely.
Shiplap and Wood Accent Fireplace Walls
Shiplap delivers farmhouse charm and scales beautifully from a narrow chimney breast to a full wall. Pine, poplar, or primed MDF shiplap boards run 5½” to 7¼” wide (nominal 1×6 or 1×8) with a rabbet or nickel-gap edge. Primed MDF is dimensionally stable and takes paint well: solid wood shows more character but can expand with humidity.
Installation steps: Locate studs and mark layout lines. Start at the bottom with the groove edge down (or up, depending on profile). Nail through the face or tongue with 18-gauge 2″ brads into each stud. Stagger joints on an 8′ or 10′ run to avoid visible seams. For a fireplace wall, many installers run boards horizontally and stop 12″ above the firebox to maintain code clearance, then cap the gap with a floating mantel or metal trim.
Reclaimed barn wood and weathered oak planks bring organic texture. Boards vary in width (4″ to 12″) and thickness (¾” to 1″), so you’ll spend time sorting and dry-fitting. Fasten with finish nails or construction adhesive on a level substrate, plywood or drywall both work. Sand any splinters and seal with a matte polyurethane or Danish oil to preserve patina without adding sheen.
Critical safety note: Wood is combustible. The National Fire Protection Association (NFPA) 211 and IRC require non-combustible materials within 6″ of the firebox opening. If you’re wrapping a wood wall around an active fireplace, frame out a non-combustible surround (tile, stone, or metal) for the immediate zone and transition to wood at safe distances. For zero-clearance or electric fireplaces, manufacturer specs override general code: read the installation manual.
Tool-wise, a miter saw handles crosscuts cleanly: a table saw rips boards to width. A pneumatic brad nailer speeds the job, but a hammer and 2″ finish nails work fine for small areas.
Tile and Marble Fireplace Surrounds
Tile and slab stone offer limitless pattern, color, and finish options, from subway tile in a herringbone layout to book-matched marble slabs. Porcelain and ceramic tile are budget-friendly, rated for heat, and available in sizes from 3×6″ subway to 12×24″ planks. Natural stone, marble, travertine, or granite, adds luxury but requires sealing and costs significantly more per square foot.
Substrate and layout: Install tile over ½” cement board, screwed to studs every 8″ vertically and horizontally. Snap level reference lines and dry-lay your pattern before mixing thinset. Use modified thinset mortar for wall tile (unmodified is for floors or over membranes). Trowel with a ¼” square-notch trowel, back-butter larger tiles, and use ⅛” or 3/16″ spacers for grout joints.
Herringbone, chevron, and stacked patterns require more cuts and planning. A wet tile saw with a sliding table makes repetitive 45° miters manageable. For intricate mosaics or natural-stone mosaics on mesh sheets, apply thinset in small sections, about 3′ × 3′, so it doesn’t skin over before you set the tile.
Marble and slab installations: Full-height book-matched marble slabs (typically 2 cm or 3 cm thick) create a dramatic, seamless look. This is a two-person job at minimum: slabs weigh 12–20 lbs per square foot. Pros use mechanical lifters and epoxy anchors into the wall framing. Unless you have slab-handling experience and the right tools, hire a stone fabricator for templating, cutting, and installation. Many design enthusiasts find inspiration in upscale fireplace galleries showcasing book-matched Calacatta or Statuario marble.
Grouting and sealing: Wait 24 hours after setting tile, then apply sanded grout (for joints wider than ⅛”) or unsanded (for tight joints). Work diagonally with a rubber float, clean haze with a damp sponge, and cure for 72 hours. Seal natural stone with a penetrating sealer before grouting to prevent staining: reapply annually.
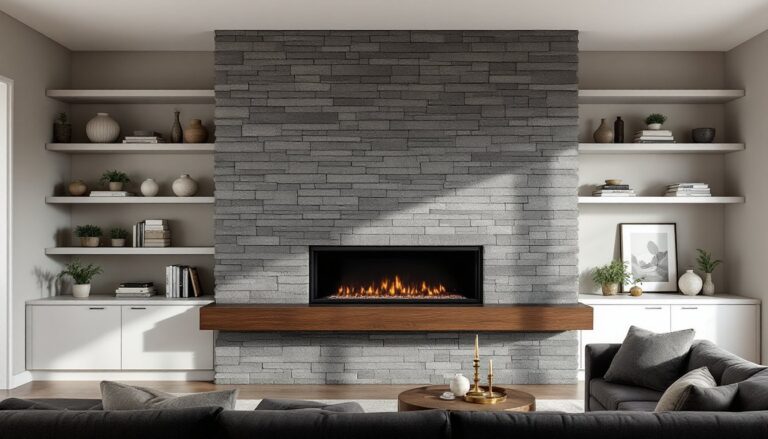
Built-In Shelving and Media Center Integration
Floor-to-ceiling built-ins flanking the fireplace transform a blank wall into a functional display and storage system. Framed cabinetry uses 1×2″ or 1×3″ face frames with ¾” plywood or MDF for shelves and sides. Adjustable shelving relies on shelf-pin holes drilled every 2″ on-center with a pegboard jig for perfect spacing.
Planning and framing: Measure your fireplace width and ceiling height. Sketch the layout: upper open shelves for décor, lower cabinets with doors for media gear or firewood. Build side towers in place or as carcasses you screw to studs. Use a laser level to transfer reference lines across the wall: built-ins look amateurish if shelves aren’t perfectly level.
Materials and joinery: ¾” hardwood plywood (maple, oak, or birch) is strong and takes stain well: ¾” MDF is smooth, stable, and ideal for paint. Join sides to top and bottom with pocket screws (1¼” coarse-thread) or dados cut on a table saw. Glue and clamp dados for maximum strength. Face-frame joints use pocket screws or biscuits.
Media integration: Plan for cable runs and ventilation. Drill 2″ holes in the back panel behind the TV zone and near components. If you’re mounting a flat-screen TV above the mantel, locate studs and use a tilting mount to angle the screen down for better viewing. Check manufacturer specs, most require a 16″ or 24″ stud span. Route power through the wall with an in-wall power kit (UL-listed): never run standard extension cords behind drywall, as it violates NEC Article 400.8.
Finishing: Fill screw holes with wood filler, sand to 220-grit, prime, and paint with a semi-gloss or satin trim paint. For stained built-ins, use pre-stain conditioner on plywood and softwoods to prevent blotching. Apply two coats of polyurethane for durability.
This project takes a committed weekend for a simple design or several weekends for custom doors, crown molding, and integrated lighting. If your design includes complex millwork or you’re uncomfortable with joinery, a trim carpenter can frame and install built-ins in two to three days.
Bold Paint Colors and Textured Finishes
A gallon of paint is the fastest, most affordable way to redefine a fireplace wall. Deep, saturated colors, charcoal, navy, forest green, or terracotta, create contrast and make the hearth pop. Matte or flat finishes hide imperfections: eggshell or satin wipe clean more easily in high-traffic rooms.
Surface prep: Fill nail holes and dings with lightweight spackle, sand smooth with 120-grit paper, then prime with a stain-blocking primer if you’re covering dark or glossy existing paint. One gallon of quality paint (Benjamin Moore Regal Select, Sherwin-Williams Duration, or similar) covers roughly 350–400 square feet per coat: a single accent wall typically needs less than a gallon.
Application tips: Cut in edges with a 2½” angled brush, then roll the field with a ⅜” nap roller for smooth walls or ½” nap for light texture. Two coats are standard: wait 2–4 hours between coats (check the can). For a ultra-smooth finish, lightly sand between coats with 220-grit and vacuum dust.
Textured plaster and limewash: Venetian plaster and Roman clay products deliver an Old-World, hand-troweled look. These materials go on in thin layers with a stainless steel trowel, burnished for sheen or left matte. Expect a learning curve, practice on scrap drywall first. Limewash paint is a mineral-based finish that creates soft, mottled color. It’s breathable, low-VOC, and develops a chalky patina. Brands like Romabio and Bauwerk offer ready-to-use formulas. Apply with a masonry brush or spray rig, working in random X-strokes to avoid streaks. Limewash requires a porous substrate (raw drywall, plaster, or brick): it won’t bond to latex paint without a specialty primer.
Color psychology: Warm neutrals (greige, taupe, warm white) make the room feel larger: bold jewel tones add drama but can shrink visual space. Test paint samples on poster board, tape them to the wall, and view in morning and evening light before committing. Many home decor guides showcase before-and-after transformations using strategic paint choices.
Minimalist and Contemporary Fireplace Designs
Minimalist fireplace walls strip away ornament in favor of clean lines, monochromatic palettes, and high-quality materials. Think linear gas fireplaces set flush into a smooth wall, concrete or stucco surrounds, and floating hearths with no visible mantel.
Flush-mount fireplace installations: Modern linear or ribbon fireplaces (brands like Heat & Glo, Napoleon, or Valor) install into a framed chase with specific clearances. The firebox face sits flush with the wall finish, drywall, concrete panel, or tile. Framing requires a steel lintel above the firebox to carry the load: consult manufacturer specs for exact dimensions. Gas line and electrical (for ignition and blower) must be run by licensed tradespeople in most jurisdictions. Permit required.
Concrete and microcement finishes: Architectural concrete panels (like those from GFRC suppliers) or site-poured concrete hearths deliver industrial elegance. Panels are ¾” to 1″ thick, reinforced with fiberglass, and weigh much less than solid concrete, about 5–7 lbs per square foot. Fasten to studs with construction adhesive and mechanical anchors. Microcement is a trowel-applied overlay (2–3 mm thick) that mimics polished concrete. It installs over drywall, plywood, or existing tile. Two or three coats build depth, then seal with a water-based polyurethane or specialty topcoat.
Metal cladding: Hot-rolled steel, blackened steel, or brushed stainless panels add industrial edge. Metal should be non-structural cladding: fasten to a fire-rated substrate with standoffs or Z-clips for ventilation behind. Steel develops surface rust (patina) unless sealed with a clear lacquer or wax. Stainless resists corrosion but shows fingerprints, specify a brushed or bead-blasted finish.
Floating shelves and invisible supports: A floating mantel, a single slab of walnut, white oak, or steel, mounts with concealed bracket rods or a steel cleat welded inside a hollow beam. For a 60″ mantel, use at least two ½” threaded rods epoxied into studs or blocking. Load capacity depends on material and span: a 6′ solid-wood mantel can support 30–50 lbs if properly anchored.
Minimalist designs often require coordination between framers, gas fitters, electricians, and finish carpenters. Budget extra time for planning and inspections.
Conclusion
A well-executed fireplace wall anchors your room and reflects your style, whether that’s rustic stone, clean-lined tile, or a bold accent color. Match your material choice to your skill level, tool access, and the realities of your fireplace type. Cosmetic updates like paint or shiplap are solid weekend DIY projects: structural work, gas fitting, or slab stone calls for licensed pros. Measure twice, respect code clearances, and don’t skip surface prep. The result is a focal point you’ll enjoy every time you walk into the room.